6 Steps for Proper Septic Tank Installation
To install a septic tank properly, start by evaluating your land’s soil and drainage. Choose a tank that fits your needs, considering materials and size based on your household usage. Next, obtain the necessary permits by researching local regulations and submitting a complete application. Prepare the installation site by clearing debris and guaranteeing proper distance from structures. Then, install the system by digging trenches and positioning the tank correctly. Finally, conduct inspections to confirm everything’s in place and working. Each step’s important, and there’s much more to uncover that can help guarantee a successful installation.
Assessing Your Land
Before you install a septic tank, you need to thoroughly assess your land to guarantee it’s suitable for the system. When you plan to install septic tanks, start by examining the soil composition; different types of soil affect how well wastewater will be absorbed. Sandy soil drains quickly, while clay soil retains water, which can lead to issues.
Next, evaluate the land drainage. You want a location that allows for proper drainage away from the tank, preventing backups or overflows. Look for areas with good natural drainage and avoid low spots where water tends to accumulate.
Also, consider the proximity of your septic tank to water sources, as you don’t want contamination.
Choosing the Right Tank
When you’re choosing the right septic tank, consider the material options and sizing that best fit your needs.
Different materials can impact durability and maintenance, while proper sizing guarantees efficient waste management.
Let’s explore these factors to help you make an informed decision.
Tank Material Options
Choosing the right tank material can greatly impact the longevity and efficiency of your septic system. You’ll typically encounter three main options: concrete, fiberglass, and plastic.
Concrete tanks are durable and offer excellent tank longevity, but they can come with higher installation costs due to weight and handling.
Fiberglass tanks are lightweight, resistant to corrosion, and easy to install, but they may not last as long as concrete.
Plastic tanks are the most affordable and lightweight, making installation simpler, but they might be less durable over time.
Weigh these options carefully based on your budget, the soil conditions, and your long-term maintenance plans to guarantee your septic system functions at its best for years.
Sizing Considerations
Determining the right size for your septic tank is essential for ensuring efficient waste management and preventing costly failures.
To choose the appropriate tank, consider your household’s daily water usage and the septic system capacity needed to accommodate it. Typically, a family of four requires a tank with a capacity of at least 1,000 gallons.
Additionally, take into account the soil absorption rates in your yard; better-draining soils may require a smaller tank, while heavy clay soils might need a larger one to prevent overflow.
It’s vital to consult local regulations and guidelines, as they may dictate minimum requirements based on the number of bedrooms or occupants in your home.
Proper sizing will help your system function effectively for years to come.
Obtaining Necessary Permits
Before you start your septic tank installation, you need to obtain the necessary permits.
Research local regulations to understand what’s required, then submit your permit application.
Research Local Regulations
Understanding local regulations is essential for obtaining the necessary permits before you start your septic tank installation. Each area has specific septic tank regulations that dictate how and where you can install your system.
You’ll need to check local health codes and zoning laws to guarantee compliance. Start by contacting your local health department or building office to gather information about the required permits and any restrictions.
Some jurisdictions may also have guidelines on soil types, tank sizes, and installation methods. Familiarizing yourself with these regulations not only keeps you within the law but also helps prevent costly mistakes down the line.
Always keep records of your research and communications, as they’ll be invaluable during the permitting process.
Submit Permit Application
Once you’ve gathered all the necessary information, it’s time to submit your permit application to confirm your septic tank installation complies with local regulations. The permit application process can seem intimidating, but it’s essential for adhering to septic tank regulations.
Here’s what you’ll need to include:
- Completed application form
- Site plan detailing the proposed installation
- Proof of property ownership
- Documentation of soil tests
- Fees associated with the permit
Make certain all your documents are accurate and complete to avoid delays. Submitting your application correctly will help you stay on schedule and guarantee your septic system is installed safely and legally.
This step is crucial for protecting both your investment and the environment.
Schedule Inspection Appointment
After you’ve submitted your permit application, it’s time to schedule an inspection appointment to confirm your septic tank installation meets all local guidelines.
Contact your local health department or permitting office to set up the inspection. They’ll check your site for compliance with regulations, including proper soil testing to verify the ground can handle the system.
This step is essential for long-term septic tank maintenance and will help prevent future issues. Be prepared to provide documentation of your permit application and any soil testing results.
During the inspection, address any concerns from the inspector to make sure your installation goes smoothly. Taking these steps seriously will save you time and money in the long run.
Preparing the Installation Site
Before digging begins, assess the area to verify it meets local regulations and is suitable for a septic tank installation. You need to take into account several factors to guarantee proper site preparation:
- Check soil quality to determine its ability to absorb wastewater.
- Analyze drainage patterns to prevent flooding around the tank.
- Identify any nearby water sources that could be affected.
- Clear the area of vegetation, rocks, and debris for easy access.
- Confirm that the site is at least 10 feet away from buildings and property lines.
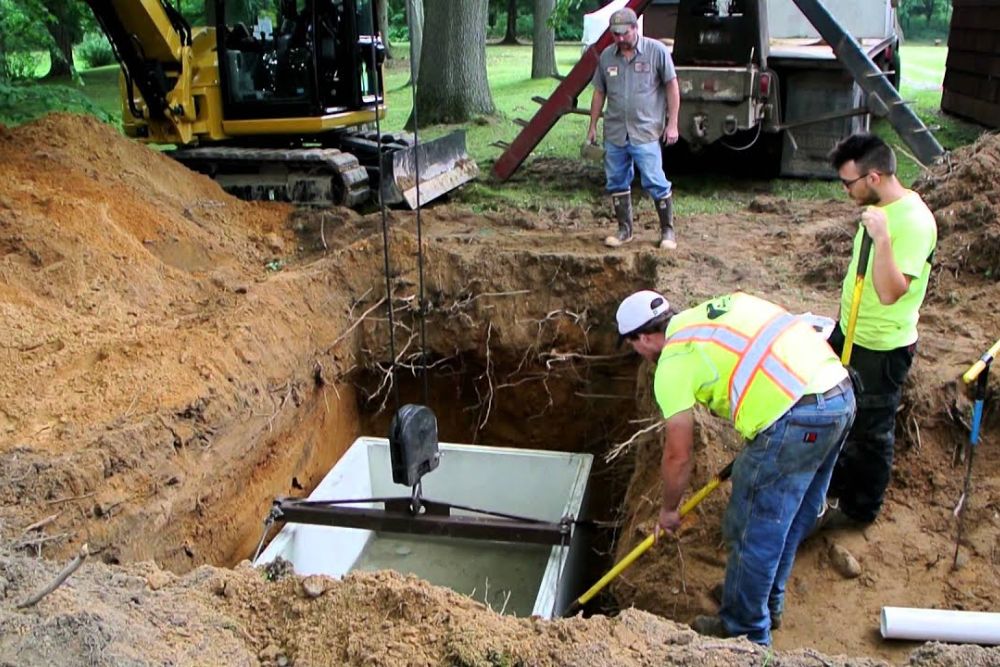
Installing the Septic System
With the site prepared, you can now proceed to install the septic system by following the necessary steps to guarantee proper functionality and compliance.
Start by carefully reviewing your septic system design, ensuring it meets local regulations.
Next, dig the trenches according to the specified depth and width, taking care to maintain proper slope for ideal drainage.
When positioning the septic tank, make sure it’s level and properly aligned with the inlet and outlet pipes.
Use installation techniques that secure the tank in place, filling the surrounding area with gravel or soil to prevent shifting.
Finally, connect the distribution box to the drain field, ensuring all pipes are fitted snugly to prevent leaks.
Your septic system is now ready for use!
Conducting Final Inspections
It’s essential to conduct thorough final inspections to confirm your septic system is installed correctly and functions as intended. Following an organized final inspection checklist can help guarantee you cover all essential aspects.
Stick to your inspection timeline to avoid delays and make sure everything runs smoothly.
Here are key items to check:
- Verify tank placement and depth
- Inspect all pipe connections for leaks
- Ensure proper grading around the tank
- Test the system for flow and drainage
- Review documentation and permits